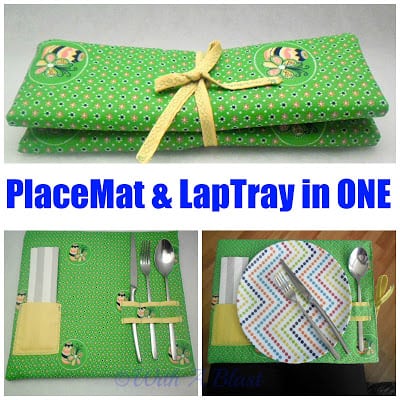
PlaceMat and LapTray in ONE
PlaceMat and LapTray in One ~ An easy sewing DIY tutorial ~ Must have for Summer – use as a lap tray or a place mat and is fully washable.

I am in a sewing mood these last couple of days and started with this easy PlaceMat and LapTray.
Now, I do not know much about sewing. But I can (usually!) get the sewing machine to do what I want.
For all of you out there, who actually know what you are doing, my apologies for wrong terminology or methods I use. At least you will have an idea of what I did.

First I cut the above pieces 2.5cm ( one inch ) larger than my board size all around. See lower down what I have used.
Which I then multiplied the width by two – to get one long rectangular shape which gets folded over.
Board sizes : 25cm (10 inches) X 35cm (14 inches)
Fabric/Batting and Linen cut to : 30cm (12 inches) X 40cm (16 inches)
1.) Outside Fabric
2.) Thin Batting
3.) Lining – I used thin linen as the standard lining might not be strong enough here

1.) Outside Fabric
2.) Thin Batting
3.) Lining
4.) x 2 = Bias binding for the Cutlery Divider (no 5)
5.) Cutlery Divider -I folded and ironed a strip of 12.5cm (5 inches)
6.) Napkin Pocket – folded and ironed flat
7.) x 2 = Bias Binding for the Ties (20cm / 8 inches)

Sewed the Bias binding to seal the top and bottom of the Cutlery Divider. Cut and tucked in the end pieces.

I sewed the Cutlery Divider onto the Top Fabric – see the X’s – I sewed each line a couple of times to make it stronger.

Sewed the Napkin Pocket onto the Top Fabric with an opening on the top to slip in the napkin. I also stitched the Bias binding for the Ties while I was busy with the smaller pieces – the Ties get sewed onto the Mat/Tray later.

One can see it is Winter in SA – my hands are all blue!
Above is the Order of the Layers – this is how I sewed everything together (see below).

The white circles show where I have pinned all three layers together all around (to make sure all is flat and there are no bubbles forming).

I started off by stitching the 3 layers together by the width (in the center) which will now form the “top” piece of the Mat/Tray.

To make it easier I cut a small piece of batting away on the side which must be open for the board to slide in.

Above you can see I simply folded the lining over the batting and the top layer just folded – then sewed it close (front and back side).
After that was done I folded the Top Fabric towards each other – the lining will now be on the outside. Leaving a small border (approx 5mm). I sewed the other length side and the “bottom” closed.
I did this twice to make it stronger – turned the, now wrong side, in – making sure to push out the corners neatly.

I used a standard size Clip Board (which is slightly larger than A4) – removed the Clip and the board was ready (these boards are extremely sturdy).
The rounded corners would also prevent tears when inserting into the Mat/Tray as this is a tight fit (also my reason for not using the very thin lining).

Slide the board into the finished Mat/Tray (I had already hand sewed the Ties at the ends).

Close it up …
and you have a handy

I thought a melamine picnic tray would look great here (seeing as one usually use a Lap Tray at a picnic/cookout/BBQ/braai…).
It fits nicely over my legs and with the extra batting on the bottom, it is very comfy as well! Standard place mats of this type normally only have a single piece of batting.

When done – replace with clean Cutlery and a Napkin – fold and tie up – ready for next time.

Use as a Place Mat on a table without the board inserted.

Slide in the board and use as a Lap Tray !
Fully washable !
PlaceMat and LapTray in One
LINDA


That would make such a cute gift! What a creative idea!
~Kim
I love this! Thank you for sharing at our Pinteresting Party! Pinning it NOW!
This is fantastic! Pinning and sharing! thank you!
too cute!!!! Thank you for sharing at Give Me The Goods!
Dimples & Pig Tales
Adorable idea!!!
Great idea!so sweet fabric print- good choice!
thanks for a good tutorial!
hugs
http://freestilcreatingbyvilly.blogspot.gr/
I absolutely love this Linda! Such a great project. They'd be perfect for camping 🙂
That is so cool Linda 🙂 Those would be awesome for a picnic! I do not know how to sew either, but I think I could fake my way thru 🙂
Love this, Linda. Thanks for linking. Linda
What a cute and clever idea!
KC
Creative indeed =)! Saw this post on Pimp Into my Paradise
MomMy Hanny
Cool idea. Stopping by from T.G.I.F. Link Party. Hello from Maryland, USA 🙂
These would be great for a picnic. Thanks for coming by and partying with us at Fluster Buster's Creative Muster.
Robin @ Fluster Buster
What a fabulous idea!
Super cute and clever! I need to make these for my kiddos! I would love for you to link up at Party In Polka Dots!
http://www.piggyinpolkadots.com/2013/06/party-in-polka-dots-26-linky-and-sweet.html
Shelley
That's awesome, really clever idea, Linda your sewing terminology is fine!
These are such a great idea! They would make the perfect take along picnic placemats!
This is a great idea. Thank you so much for sharing it. I have been thinking of making a tray for my laptop and your project is a big inspiration.
Traci
How clever! It looks great.
Heidi’s Wanderings
Thanks so much for hosting the "Let's Get Social Sunday" blog hop!
Angie
PS – I would also like to invite you to a blog hop called: “The Great Blog Train” currently live on my blog (the kind of hop where you link up your homepage)– Thank you! Great Blog Train
Looks great! A wonderful idea Linda!
Bravo! Very original!
Greetings from Bulgaria!!!