
Easy DIY Candles
Easy DIY Candles – Step-by-step tutorial on how to make your own candles in containers, color and scent tips included as well.
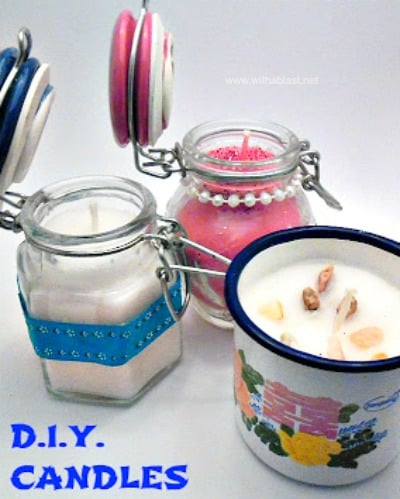
I am not sharing nearly enough projects and crafts with you !
Candle making is very easy and you can really make what you want. Today I’d like to show you how I make these Easy DIY Candles in everyday, mostly boring, containers.
The glass containers, as well as the tin mugs, are ideal to use. Once the candle has burnt out, one can use it as little trinket holders, store food items. Glass and metal does not absorb wax – just wash it well before using for edible stuff) – or make a new candle!
I have candles for Africa … as the saying goes here in SA! Candles where I have used different types of everyday containers. Examples: fruit juice bottles, headache tablet containers, empty toilet roll holders, etc.
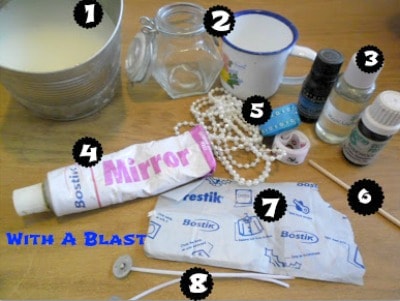
Supplies needed for candle making in containers :
1.) Candle Wax (I used some colored wax as well, but forgot to include that in the pic above)
2.) Any container (just not something that will melt easily – the wax is quite hot)
3.) Essential Oils – there are many on the market (incl Citronella which is ideal to keep mozzies away!)
4.) Mirror silicone glue. (I prefer this when decorating glass as it is see-through when it dries and as the candle burns down, there won’t be any white glue marks to see through the glass)
5.) Any decorations – ribbon, tiny pearl strings, pieces of mosaic ..
6.) Medium length kebab sticks (The size varies according to the container opening)
7.) Prestik
8.) Wick (buy with the small metal piece from craft shops)


Prepare the containers by pressing a piece of Prestik to the bottom of the metal end of the candle Wick(as shown above). This will help keep the wick straight up.

I use any long item to gently press the metal piece to the bottom of the glass, making sure it sticks well into place.

To keep it straight to the top I used a medium sized Kebab stick, twisted the wick around it, and secured the stick with some more Prestik. The container is now ready for wax to be poured in.
Melt the wax until clear and there are no lumps – keep an eye on this, and stir frequently. (I use an old saucepan filled halfway with water. I then add my wax, which is in an old can, using pliers to lift the can to and from the pot).
Add any coloring and essential oils as soon as the wax has melted – stir very well to combine all. Use an old measuring jug or something similar (easier to pour into narrow openings) and pour into the containers.
As the wax start to set, there might be air bubbles – just use a toothpick to burst them and refill with wax.<
Once the wax has fully settled – remove the kebab stick and the Prestik from the top – cut the wick to stick out about 1 – 1/1/2 centimeters or to your preference.
The container is now ready to be decorated as you wish.
You might also like:
Easy DIY Candles
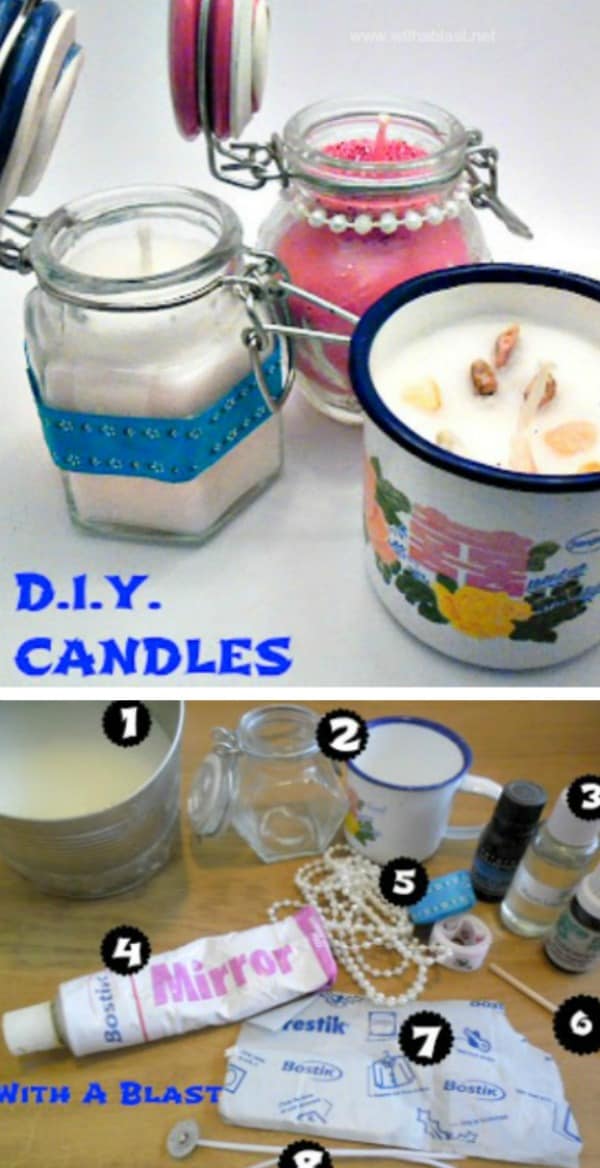
I only added some tiny rock pieces to the top of my tin mug container. (when adding decorations to the top of the candle – wait until the wax has almost set and just press slightly to bond with the wax).
Great post! Saw you linked up on a bunch of link parties. Would love if if you linked up on my blog hop and added it to your list http://www.w-t-fab.com/search/label/bloghop. Also let me know if you'd like to follow each other!
This is a great tip! I'll be doing this too!
These are so creative! I love yummy candles and this gives me lots of ideas – Thank you for sharing at MightyCrafty Mondays!
Hi Linda,
What a clever idea. I especially like them in the tin cups. I bought a candle in a tin cup. I think I will need to make a new one when it is all used up. Thanks for sharing with Share Your Cup.
Hugs,
Jann
I like the one with pearls. Thanks for sharing at OneCreativeMommy.com.
What a nice easy project. I haven't made candles in years. This would be fun to do.
Yael from Home Garden Diggers
It really is easy and so much fun when you choose the container and do the decorating to suit you. Thanks for stopping by,
Linda
Those are so pretty!
Thanks for sharing with my Super Link Party! 🙂
I've gotta try this. They turned out really pretty too. Thanks for linking up at Doodles & Stitches 🙂
Thanks for sharing! I like how you used the kebob to hold the wick straight!
This is a great post. Thanks so much for sharing it at my Say G'day Linky party. I've just pinned this and give it a +1 on Google. I will also be featuring it today!
Best wishes,
Natasha in Oz
Thank you so much, Natasha! {on all 3 counts..}
Have a lovely day!
Linda
Great tutorial. Thanks for sharing!!
It has been a long time since I made candles, but I have been thinking of making some soon. Thanks for sharing. ;o)
I find it to be one of my more relaxing hobbies. We're renovating our kitchen at the moment so there's not really time for anything else right now 😉
Thank you for leaving a comment,
Linda
Wow, looks great
http://www.iheartpears.blogspot.com
Thank you so much! Have a great day now,
Linda
These are fantastic! Thanks so much for sharing this wonderful tutorial at the Back For Seconds Social, I am featuring you this week!!
Thank you! I'll see you at the party – have a great day.
Linda
It really is easy! Try it – bet you'll love it and the possibilities are endless. I'll be at the party tomorrow {of course 😉 }
Linda
Definitely gonna try this! Thanks for sharing! Liz
It's quite addictive once one start – hope you'll enjoy making some!
Linda
I would love if you link this to the Mega Jar link party on my blog!
Xo
http://lechateaudesfleurs.blogspot.com/2012/08/mason-jar-link-mega-party.html
I was hoping you would share a candle craft at some point! This look really simple and would be a good way to recycle the jars.
I love making candles but haven't had time lately. Thanks for sharing at the All Star Block Party.
Holly
Thank you so much for sharing this post about making candles with Wednesdays Adorned From Above Link Party. What a great idea. Can't wait to try it.
Debi Bolocofsky
http://www.adornedfromabove.com
Hi Linda,
Sorry this is late, but better late then never. Thanks so much for sharing with last weeks with Wednesday's Adorned From Above. The link party is open now for this week.
Debi Bolocofsky
http://www.adornedfromabove.com
Great project!